
The challenge is that, if performed after resizing down to the augmented size, various common data augmentation transforms might introduce spurious empty zones, degrade data, or both. For instance, rotating an image by 45 degrees fills corner regions of the new bounds with emptiness, which will not teach the model anything. Many rotation and zooming operations will require interpolating to create pixels. These interpolated pixels are derived from the original image data but are still of lower quality.
To work around these challenges, presizing adopts two strategies that are shown in <>:
- Resize images to relatively “large” dimensions—that is, dimensions significantly larger than the target training dimensions.
- Compose all of the common augmentation operations (including a resize to the final target size) into one, and perform the combined operation on the GPU only once at the end of processing, rather than performing the operations individually and interpolating multiple times.
The first step, the resize, creates images large enough that they have spare margin to allow further augmentation transforms on their inner regions without creating empty zones. This transformation works by resizing to a square, using a large crop size. On the training set, the crop area is chosen randomly, and the size of the crop is selected to cover the entire width or height of the image, whichever is smaller.
In the second step, the GPU is used for all data augmentation, and all of the potentially destructive operations are done together, with a single interpolation at the end.
This picture shows the two steps:
- Crop full width or height: This is in , so it’s applied to each individual image before it is copied to the GPU. It’s used to ensure all images are the same size. On the training set, the crop area is chosen randomly. On the validation set, the center square of the image is always chosen.
- Random crop and augment: This is in
batch_tfms, so it’s applied to a batch all at once on the GPU, which means it’s fast. On the validation set, only the resize to the final size needed for the model is done here. On the training set, the random crop and any other augmentations are done first.
To implement this process in fastai you use Resize as an item transform with a large size, and RandomResizedCrop as a batch transform with a smaller size. RandomResizedCrop will be added for you if you include the min_scale parameter in your aug_transforms function, as was done in the DataBlock call in the previous section. Alternatively, you can use pad or squish instead of crop (the default) for the initial Resize.
In [ ]:
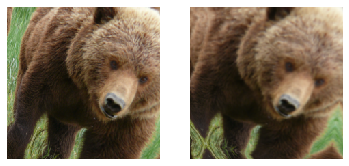
You can see that the image on the right is less well defined and has reflection padding artifacts in the bottom-left corner; also, the grass at the top left has disappeared entirely. We find that in practice using presizing significantly improves the accuracy of models, and often results in speedups too.
The fastai library also provides simple ways to check your data looks right before training a model, which is an extremely important step. We’ll look at those next.
We can never just assume that our code is working perfectly. Writing a DataBlock is just like writing a blueprint. You will get an error message if you have a syntax error somewhere in your code, but you have no guarantee that your template is going to work on your data source as you intend. So, before training a model you should always check your data. You can do this using the show_batch method:
In [ ]:
dls.show_batch(nrows=1, ncols=3)
If you made a mistake while building your DataBlock, it is very likely you won’t see it before this step. To debug this, we encourage you to use the summary method. It will attempt to create a batch from the source you give it, with a lot of details. Also, if it fails, you will see exactly at which point the error happens, and the library will try to give you some help. For instance, one common mistake is to forget to use a Resize transform, so you end up with pictures of different sizes and are not able to batch them. Here is what the summary would look like in that case (note that the exact text may have changed since the time of writing, but it will give you an idea):
In [ ]:
Setting-up type transforms pipelinesCollecting items from /home/jhoward/.fastai/data/oxford-iiit-pet/imagesFound 7390 items2 datasets of sizes 5912,1478Setting up Pipeline: PILBase.createSetting up Pipeline: partial -> CategorizeBuilding one samplePipeline: PILBase.createstarting from/home/jhoward/.fastai/data/oxford-iiit-pet/images/american_pit_bull_terrier_31.jpgapplying PILBase.create givesPILImage mode=RGB size=500x414Pipeline: partial -> Categorizestarting from/home/jhoward/.fastai/data/oxford-iiit-pet/images/american_pit_bull_terrier_31.jpgapplying partial givesapplying Categorize givesTensorCategory(13)Final sample: (PILImage mode=RGB size=500x414, TensorCategory(13))Setting up after_item: Pipeline: ToTensorSetting up after_batch: Pipeline: IntToFloatTensorBuilding one batchApplying item_tfms to the first sample:Pipeline: ToTensorstarting from(PILImage mode=RGB size=500x414, TensorCategory(13))applying ToTensor gives(TensorImage of size 3x414x500, TensorCategory(13))Adding the next 3 samplesNo before_batch transform to applyCollating items in a batchError! It's not possible to collate your items in a batchCould not collate the 0-th members of your tuples because got the following shapestorch.Size([3, 414, 500]),torch.Size([3, 375, 500]),torch.Size([3, 500, 281]),torch.Size([3, 203, 300])
Setting-up type transforms pipelinesCollecting items from /home/sgugger/.fastai/data/oxford-iiit-pet/imagesFound 7390 items2 datasets of sizes 5912,1478Setting up Pipeline: PILBase.createSetting up Pipeline: partial -> CategorizeBuilding one samplestarting from/home/sgugger/.fastai/data/oxford-iiit-pet/images/american_bulldog_83.jpgapplying PILBase.create givesPILImage mode=RGB size=375x500starting from/home/sgugger/.fastai/data/oxford-iiit-pet/images/american_bulldog_83.jpgapplying partial givesamerican_bulldogapplying Categorize givesTensorCategory(12)Final sample: (PILImage mode=RGB size=375x500, TensorCategory(12))Setting up after_item: Pipeline: ToTensorSetting up before_batch: Pipeline:Setting up after_batch: Pipeline: IntToFloatTensorBuilding one batchApplying item_tfms to the first sample:Pipeline: ToTensorstarting from(PILImage mode=RGB size=375x500, TensorCategory(12))applying ToTensor gives(TensorImage of size 3x500x375, TensorCategory(12))Adding the next 3 samplesNo before_batch transform to applyCollating items in a batchError! It's not possible to collate your items in a batchCould not collate the 0-th members of your tuples because got the followingshapes:torch.Size([3, 375, 500])
You can see exactly how we gathered the data and split it, how we went from a filename to a sample (the tuple (image, category)), then what item transforms were applied and how it failed to collate those samples in a batch (because of the different shapes).
Once you think your data looks right, we generally recommend the next step should be using it to train a simple model. We often see people put off the training of an actual model for far too long. As a result, they don’t actually find out what their baseline results look like. Perhaps your problem doesn’t need lots of fancy domain-specific engineering. Or perhaps the data doesn’t seem to train the model at all. These are things that you want to know as soon as possible. For this initial test, we’ll use the same simple model that we used in <>:
In [ ]:
| epoch | train_loss | valid_loss | error_rate | time |
|---|---|---|---|---|
| 0 | 0.529473 | 0.312148 | 0.095399 | 00:23 |
| 1 | 0.330207 | 0.245883 | 0.080514 | 00:24 |
As we’ve briefly discussed before, the table shown when we fit a model shows us the results after each epoch of training. Remember, an epoch is one complete pass through all of the images in the data. The columns shown are the average loss over the items of the training set, the loss on the validation set, and any metrics that we requested—in this case, the error rate.
Remember that loss is whatever function we’ve decided to use to optimize the parameters of our model. But we haven’t actually told fastai what loss function we want to use. So what is it doing? fastai will generally try to select an appropriate loss function based on what kind of data and model you are using. In this case we have image data and a categorical outcome, so fastai will default to using cross-entropy loss.

