
Add Android App Links
To add support for Android App Links:
- Create intent filters in your manifest.
- Associate your app and your website with Digital Asset Links.
The App Links Assistant in Android Studio 2.3 and higher simplifies the process in a step-by-step wizard, as described below.
For more information about how app links work and the benefits they offer, read .
The App Links Assistant in Android Studio can help you create intent filtersin your manifest and map existing URLs from your website to activities in your app. The App LinksAssistant also adds template Java code in each corresponding activity to handle the intent.
To add intent filters and URL handling, follow these steps:
- Select Tools > App Links Assistant.
- Click Open URL Mapping Editor and then click Add at the bottom of the URL Mapping list to add a new URL mapping.
-
- Enter your website's URL in the Host field.
- Add a for the URLs you want to map. For example, if you have a recipe-sharing app, with all the recipes available in the same activity, and your corresponding website's recipes are all in the same /recipe directory, use pathPrefix and enter /recipe. This way, the URL http://www.recipe-app.com/recipe/grilled-potato-salad maps to the activity you select in the following step.
- Select the Activity the URLs should take users to.
- Click OK.
The App Links Assistant adds intent filters based on your URL mapping to the file, and highlights it in thePreview field. If you'd like to make any changes, click OpenAndroidManifest.xml to edit the intent filter. (Learn more about .)
Note: To support more links without updating your app, you should define a URL mapping that supports URLs that you'll add in the future. Also, remember to include a URL for your app home screen so it's included in search results.To verify your URL mapping works properly, enter a URL in the Check URL Mapping field and click Check Mapping. If it's working correctly, the success message shows that the URL you entered maps to the activity you selected.
Once you've verified that your URL mapping is working correctly, add logic to handle the intent you created.
- Select an activity from the list and click Insert Code.
The App Links Assistant adds code to your activity's Java file, similar to the following (Please note: Currently the App Links Assistant does not support Kotlin so you will need toadd this code manually):
However, this code isn't complete on its own. You must now take an action based on the URI in appLinkData, such as display the corresponding content. For example, for the recipe-sharing app, your code might look like the following sample:
After setting up URL support for your app, the App Links Assistant generates a Digital Asset Links file you can use to associate your website with your app.
To associate your app and your website using the App Links Assistant, click Open Digital Asset Links File Generator from the App Links Assistant and follow these steps: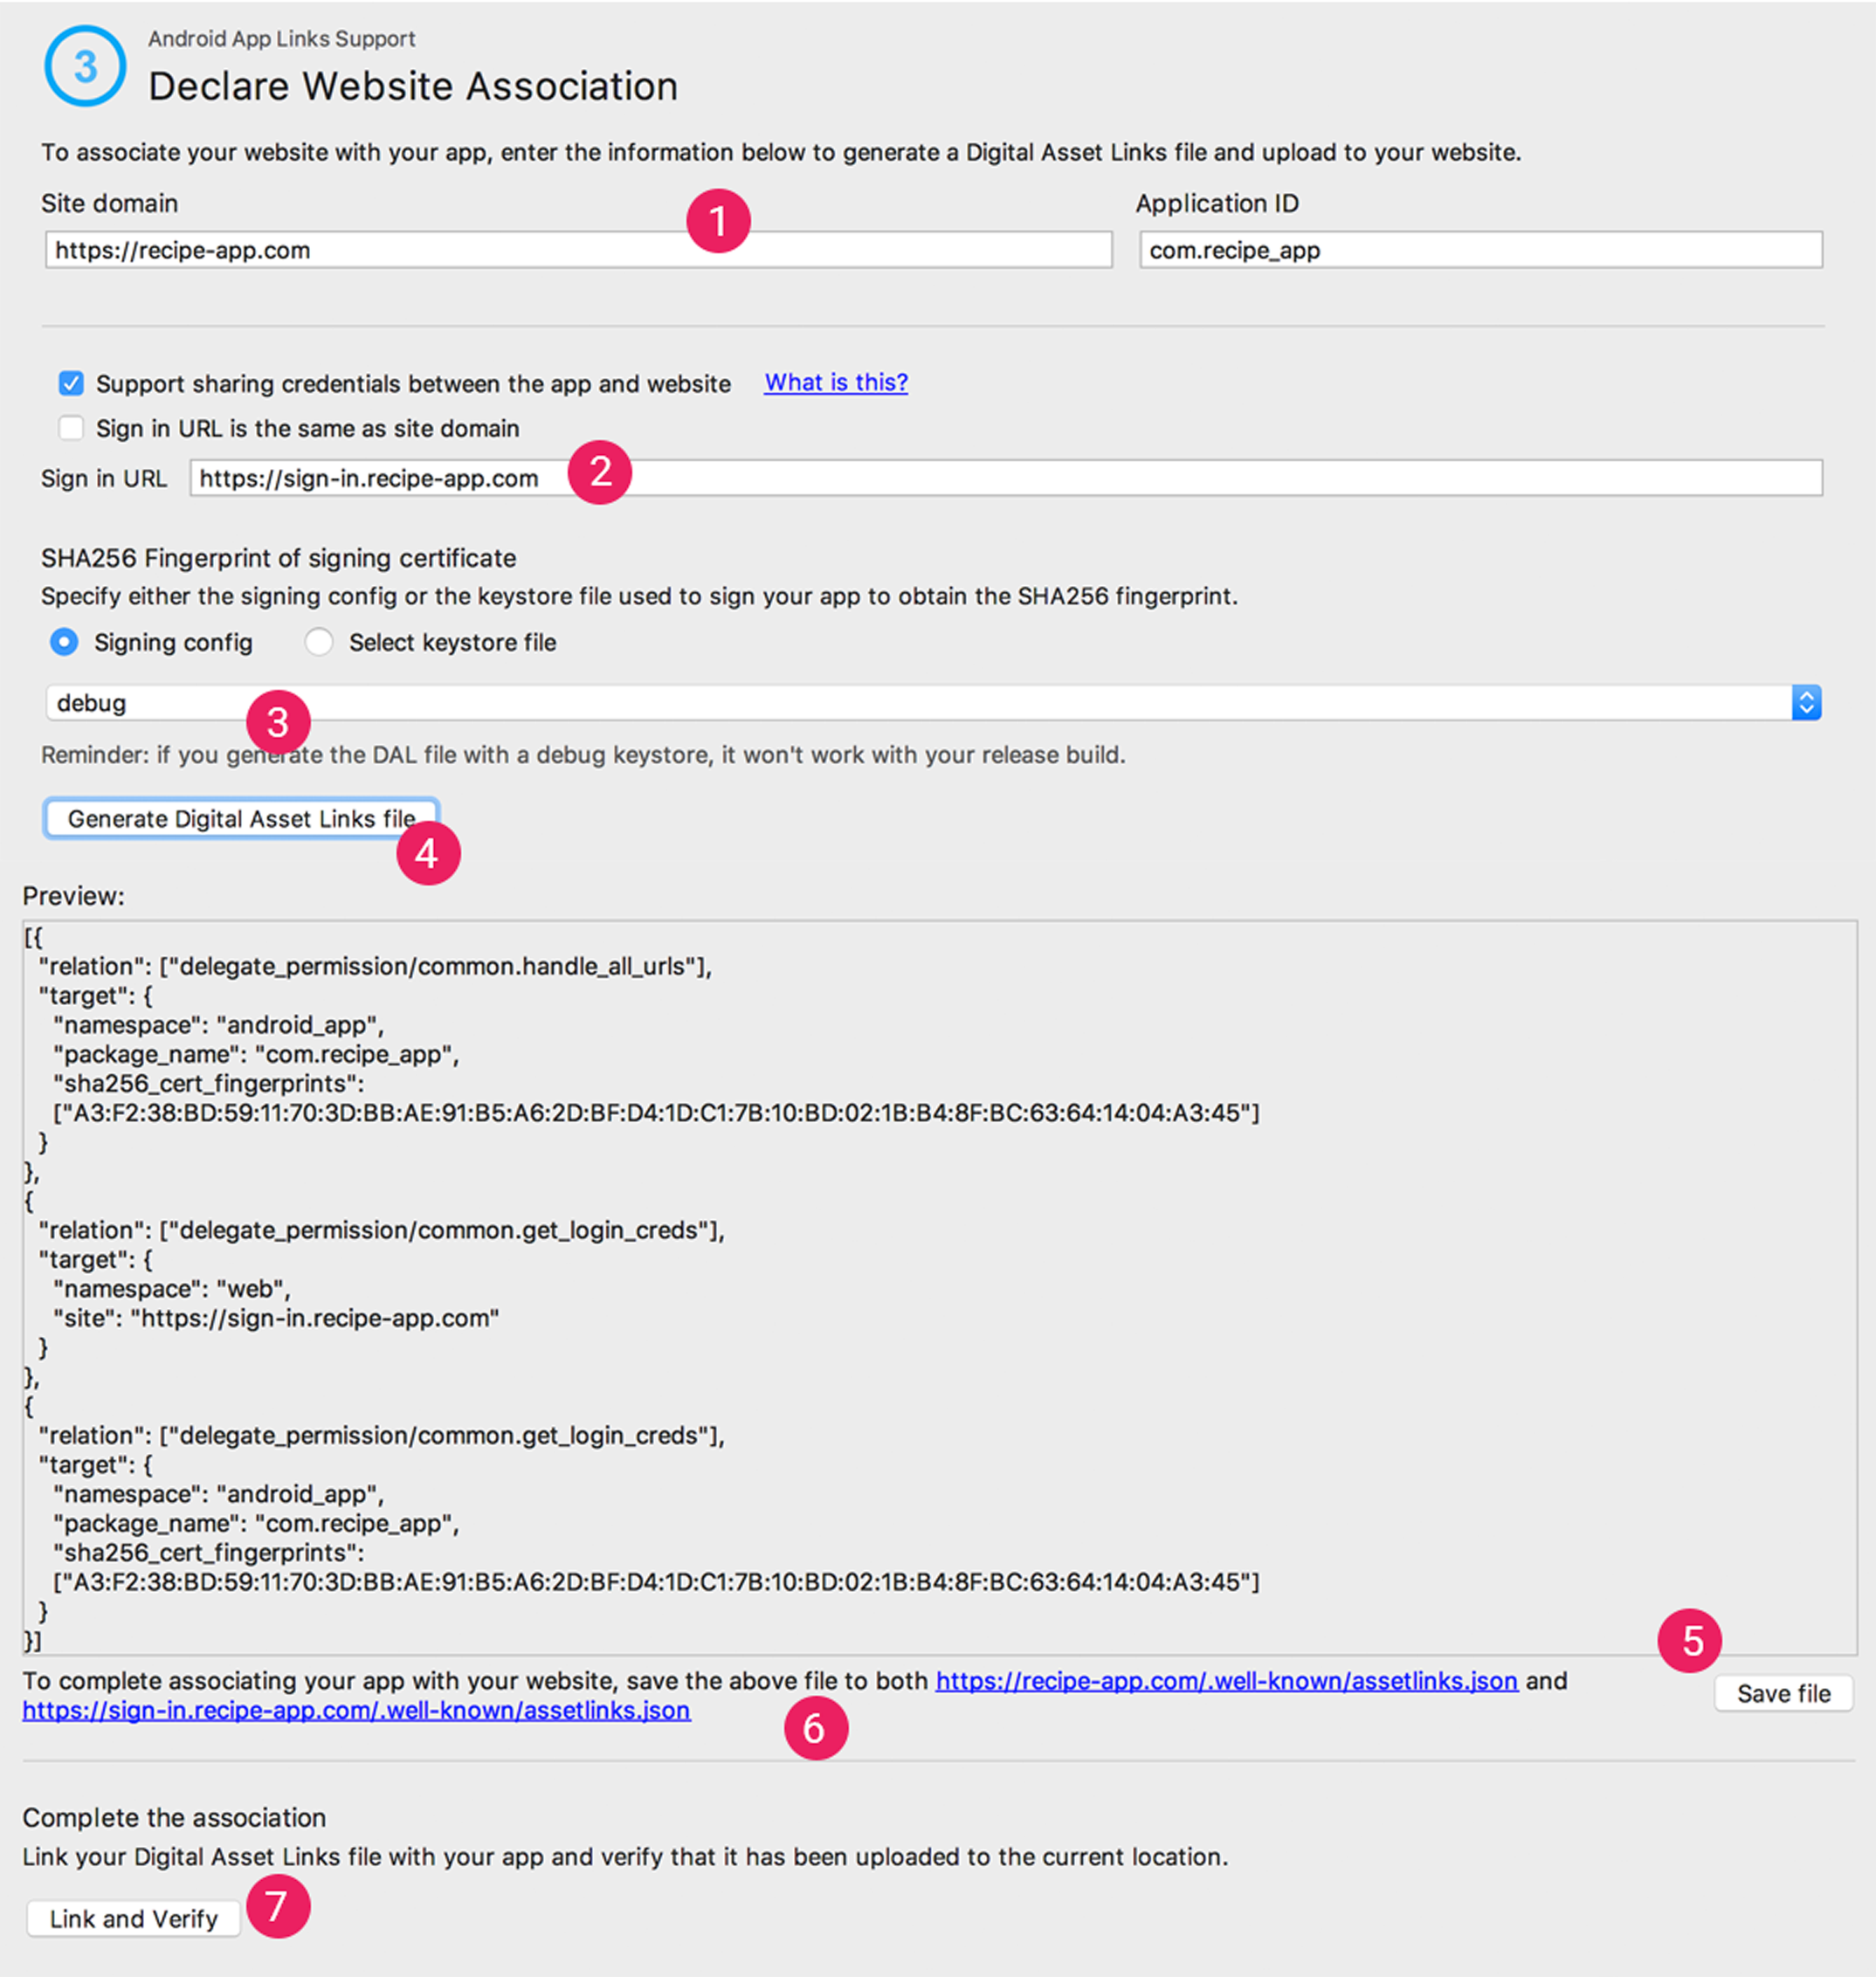
Figure 2. Enter details about your site and app to generate a Digital Asset Links file.
- Enter your Site domain and your .
- To include support in your Digital Asset Links file for Smart Lock for Passwords, select Support sharing credentials between the app and the website and enter your site's login URL. This adds the following string to your Digital Asset Links file declaring that your app and website share sign-in credentials: . Learn more about supporting in your app.
- Specify the signing config or select a . Make sure you select the right config or keystore file for either the release build or debug build of your app. If you want to set up your production build, use the release config. If you want to test your build, use the debug config.
- Click Generate Digital Asset Links file.
- Once Android Studio generates the file, click Save file to download it.
Upload the
assetlinks.jsonfile to your site, with read-access for everyone, at .
Important: The system verifies the Digital Asset Links file via the encrypted HTTPS protocol. Make sure that theassetlinks.jsonfile is accessible over an HTTPS connection, regardless of whether your app's intent filter includes .Click Link and Verify to confirm that you've uploaded the correct Digital Asset Links file to the correct location.
Learn more about associating your website with your app through the Digital Asset Links file in Declare Website Associations.
To verify that your links open the correct activity, follow these steps:
- Click Test App Links in the App Links Assistant.
- Enter the URL you want to test in the URL field, for example, http://recipe-app.com/recipe/grilled-potato-salad.
Figure 3. The App Links Assistant displays a success message and opens your app to the specified content when the URL you're testing successfully maps to an activity in your app.
- If the URL mapping isn't set up properly or doesn't exist, an error message appears under the URL in the Test App Links window. If the URL mapping exists, Android Studio launches your app in the device or emulator at the specified activity without showing the disambiguation dialog (app "chooser"), and shows a success message in the App Link Testing window. If Android Studio can't successfully launch the app, an error message appears in Android Studio's Run window.
To test Android App Links through the App Links Assistant, you must have a device connected or a virtual device available running Android 6.0 (API level 23) or higher. For more information, see how to or create an AVD.
After adding Android App Links to your app, you can add Firebase App Indexing code to an activity to get re-engagement to your app from additional Google Search features, including autocomplete suggestions and In Apps search. Learn more about Firebase App Indexing in the

