
Known issues with Android Studio and Android Gradle Plugin
- Out of memory errors when scanning C++-based projects: When Gradle scansa project that has C++ code in more than one location on the same drive, thescan includes all directories below the first common directory. Scanninga large number of directories and files may lead to out of memory errors.
If you experience this behavior in your project, we recommend using AndroidStudio 3.2. For more information on this issue, readthe associated with theissue.
- Espresso Test Recorder compilation failure: Compilation fails with themessage when you attempt to build aproject that uses the Espresso Test Recorder. This issue affects versions ofAndroid Studio below 3.2 that use version 3.0.2 or later of the
espresso-coredependency. This issue does not affect AndroidStudio 3.2 and higher.
If you are using Android Studio 3.1 or lower, you can work around this issueby setting a dependency on a version of espresso-core below 3.0.2 or byadding a separate rules dependency, as shown in theEspresso setup instructions.
The
@RestrictTolint check does not work for Windows machines: InAndroid Studio 2.3, the@RestrictTolint check does not correctly triggererror messages on Windows machines.Virtual devices with parentheses in their names will not run: In AndroidStudio version 2.2, although you can include parentheses in the name of aVirtual Device (and in fact, some devices, like Android TV, includeparentheses in their names automatically), you cannot run a virtual devicethat uses parentheses in its name. To avoid this problem, edit the VirtualDevice to remove all "
(" and ")" characters from the name.
This issue has been resolved as of Android Studio 2.3
Instant Run is not compatible with Jack: Instant Run is currently notcompatible with the Jack compiler, so it is disabled for projects using theJack compiler. (Using the Jack compiler is only necessary when using .)
Tools and libraries that require the app's class files are not compatiblewith Jack: Various tools that read
.classfiles (such as JaCoCo,Mockito, and some lint checks) are currently not compatible with the Jackcompiler.Gradle build unable to clean output folders when project is on NTFS onLinux: Because of the file locking behavior of NTFS, on Windows machines,Android Studio automatically copies the classes' JAR files to another locationbefore indexing, so that subsequent Gradle builds can clean and make changesto the build/tree. See issue 202297 for moreinformation. This behavior is not enabled when using NTFS on Linux or OSXmachines, but can beby uncommenting the following line:
Mac performance: The OpenJDK 1.8.0_76 bundled with Studio 2.2 has a fewproblems on Mac. Using an external 4K monitor with a scaled resolution canadversely impact rendering performance as discussed in issue203412 and in, up to thepoint that the IDE becomes unresponsive. Additionally, as reported in issue223749 and in, scrollingis very sensitive on Mac 10.12 (Sierra).
Gradle Sync Failed: Broken Pipe: The issue is that the Gradle daemon istrying to use IPv4 instead of IPv6.
- Workaround 1: On Linux, put the following in your
~/.profileor~/.bash_profile:
- Workaround 1: On Linux, put the following in your
export _JAVA_OPTIONS="-Djava.net.preferIPv6Addresses=true"
Workaround 2: in Android Studio's vmoptionsfile,change the line
-Djava.net.preferIPv6Addresses=trueto-Djava.net.preferIPv6Addresses=trueFor more information, see the.- "peer not authenticated" errors from Gradle sync or SDK Manager: Theroot cause of these errors is a missing certificate in
$JAVA_HOME/jre/lib/certificates/cacerts. To resolve these errors, proceedas follows:
- "peer not authenticated" errors from Gradle sync or SDK Manager: Theroot cause of these errors is a missing certificate in
If you're behind a proxy, try to connect directly. If the directconnection works, then in order to connect via the proxy you may need touse
keytoolto add the proxy server's certificate to the cacerts file.- Re-install a supported, unmodified JDK. There's aknown issueaffecting Ubuntu users, which results in an empty
/etc/ssl/certs/java/cacerts. To work around this issue, execute thefollowing on the command line:
- $ sudo /var/lib/dpkg/info/ca-certificates-java.postinst configure
- JUnit tests missing resources in classpath when run from Android Studio:If you have specific resource folders in your Java modules, then thoseresources won't be found when running tests from the IDE. Running testsusing Gradle from the command line will work. Executing the Gradle
checktask from the IDE will also work. See for moredetails.
This issue happens because as of IntelliJ 13, you can only havea single folder as the classpath. IntelliJ's builder copies all resourcesinto that build folder, but Gradle doesn't copy over the resources.
- Workaround 1: Run the Gradle
checktask from the IDE rather thanrunning a unit test. -
- Running JUnit tests may compile the code twice: When creating a newproject, the template JUnit configuration might be created with two "Beforelaunch" steps: Make and Gradle-aware Make. This configuration is thenpropagated to all created JUnit run configurations.
To fix the issue for the current project, click Run > EditConfigurations and change the default JUnit configuration to onlyinclude the Gradle-aware Make step.
To fix the issue for all future projects, click File > CloseProject. You should see the welcome screen. Then click Configure >Project Defaults > Run Configurations and change the JUnitconfiguration to only include the Gradle-aware Make step.
- Some test run configurations don't work: Not all run configurations thatare available when right-clicking a test method are valid. Specifically, thefollowing configurations are not valid:
Gradle run configurations (which have a Gradle logo as the icon) don't work.
- JUnit run configurations (which have an icon without the green Android)don't apply to instrumentation tests, which cannot be run on the local JVM.Android Studio also remembers the run configuration created in a givencontext (for example, right-clicking a specific class or method), and will notoffer to run in a different configuration in the future. To fix this, clickRun > Edit Configurations and remove the incorrectly-createdconfigurations.
Linux and the Awesome WM 3.4: Android Studio versions 0.8.3 and highermay not work correctly with the "Awesome WM" window manager version 3.4. Toresolve this issue, upgrade to Awesome WM version 3.5.
Frozen keyboard input - "iBus" problems on Linux: There are some knowninteractions between the iBus daemon on Linux and Android Studio. In somescenarios, the IDE stops responding to keyboard input or starts inputtingrandom characters. This bug is triggered by some missing synchronizationbetween iBus and XLib + AWT, and has already been reported upstream toJetBrainsand . There arethree current workarounds for this issue:
- Workaround 1: Force iBus into synchronous mode. Before starting AndroidStudio, run the following on the command line:
- $ IBUS_ENABLE_SYNC_MODE=1 ibus-daemon -xrd
- Workaround 2: Disable iBus input in Android Studio. To disable iBus inputfor Android Studio only, run the following on the command line:
- $ XMODIFIERS= ./bin/studio.sh
This workaround only disables input methods for Android Studio, notany other applications you may be running. Note that if you restart thedaemon while Android Studio is running (for example, by runningibus-daemon -rd), you effectively disable the input methods for allother applications and may also crash Android Studio's JVM with asegmentation fault.
- Workaround 3: Double-check the shortcut bindings to make sure that theNext input shortcut is not set to Control+Space, since this is alsothe code completion shortcut in Android Studio. Ubuntu 14.04 (Trusty)makes Super+Space the default shortcut, but settings from previousversions may still be around. To check your shortcut bindings, run
ibus-setupon the command line to open the IBus Preferences window.Under Keyboard Shortcuts, check the Next input method. If it isset to Control+Space, change it to Super+Space, or another shortcut ofyour choice.- Ubuntu and JAyatana: JAyatana allows Java Swing applications to integratewith the global menu in Ubuntu's Unity graphical shell. In some cases, AndroidStudio may encounter a NullPointerException under Unity, with an error messagesuch as:
For more information, see issue187179. Because of this issue, newer versions of Ubuntu are . If you encounter this problem, there are two possibleworkarounds (see thisStack Overflow post for more information):
- Workaround 2: Uninstall JAyatana.
- Adding Java breakpoints while debugging native code: While your app is paused at a breakpoint in your nativecode, the Auto and Dual debuggers may not immediately recognizenew Java breakpoints that you set. To avoid this issue, add Java breakpointseither before starting a debug session or while the app is paused on a Javabreakpoint. For more information, see .
Stepping out of the native debugger: While using the Auto or Dual debugger todebug Java and native code, if you step into a native function from_your Java code (for example, the debugger pauses execution at a line in yourJava code that calls a native function and you click Step Into) and you want to return to your Java code, clickResume Program
 (instead of Step Out or Step Over
 ). Your app process will still be paused, so click ResumeProgram in the **_your-module-java**tab to resume it. For more information, see issue224385.
Spurious render exception: The specific render error message is: "Thefollowing classes could not be found: -android.support.v7.internal.app.WindowDecorActionBar". Despite the errormessage, the layout preview is correct and the message can be safelyignored.
This issue has been fixed as of the Android Studio 2.0 preview.
Android Emulator HAXM on macOS High Sierra: The Android Emulator onmacOS High Sierra (10.13) requires HAXM 6.2.1+ for bestcompatibility and stability with macOS. However, macOS 10.13 has a moreinvolved process to install kernel extensions such as HAXM. You needto manually allow the kernel extension itself to be installed as follows:
- First, attempt to install the latest version of HAXM from the.
- In MacOS, go to System Preferences > Security and Privacy.
- If you see an alert that System software from developer "Intel CorporationApps" was blocked from loading, click Allow:
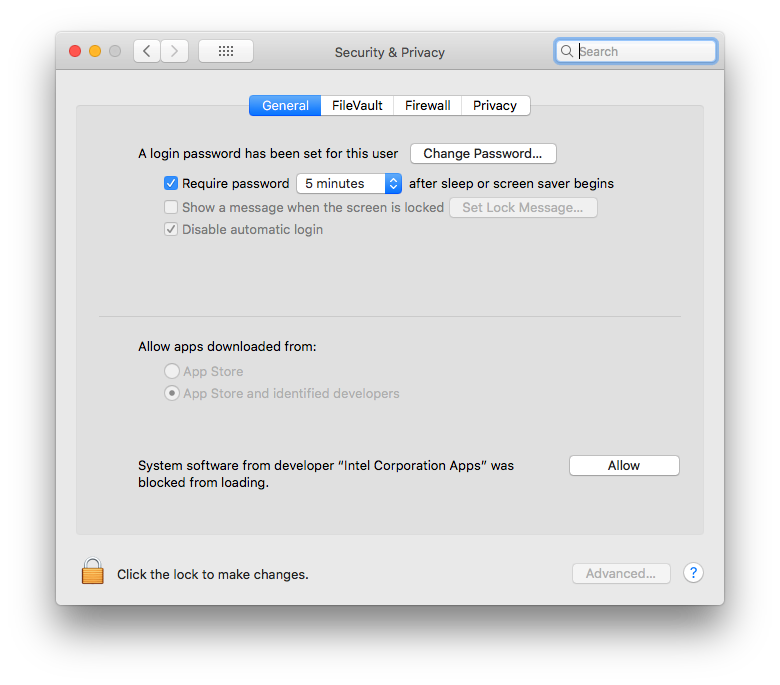
For more information and workarounds, seethis Apple webpage and .
Known issues with the Android Gradle Plugin
- Configuration on demand with Gradle 4.6 and above: If you're usingAndroid Gradle Plugin 3.0.x or3.1.x with Gradle 4.6 and above, you should disable configuration on demandto avoid some unpredictable build errors. (If you are using Android GradlePlugin 3.2.0 or higher, you do not need to take any action to disableconfiguration on demand.)
org.gradle.configureondemand=false
To disable configuration on demand in the Android Studio settings, chooseFile > Settings (Android Studio > Preferences on Mac), select theCompiler category in the left pane, and clear the Configure on demandcheckbox.
In Android Studio 3.2 Beta 1 and higher, the options for enablingconfiguration on demand have been removed.
Project Sync Error while loading Android Plugin 3.0.0 multiple times:Loading the Android plugin multiple times in a single build leads to aproject sync error. This can occur when you have multiple subprojects thateach include the Android plugin in their buildscript classpath. This is alimitation of Gradle’s new variant-aware dependency management, which cannotyet handle matching attributes from different classloaders. If you are usingAndroid Plugin 3.0.0 or lower, upgrade the plugin to and higher or follow the steps belowto reslove the issue:
- Multi-module Builds: Make sure that you add the Android plugin toonly the build classpath of your top-level
build.gradlefile, as shownbelow:
- Multi-module Builds: Make sure that you add the Android plugin toonly the build classpath of your top-level
// Additionally, make sure that you don't wrap this in a// subprojects block.buildscript {...dependencies {classpath 'com.android.tools.build:gradle:3.4.0'}}
- Composite Builds: Make sure that, for the main project and eachincluded project that uses the Android plugin, the buildscript classpathsare identical. This also requires the order of the classpaths you add tothe
buildscriptblock to be identical.For example, consider the following classpath dependencies included inthebuild.gradlefile of the main project:
buildscript {...dependencies {classpath "com.android.tools.build:gradle:3.4.0"classpath "me.tatarka:gradle-retrolambda:3.7.0"}}
Now consider the following build.gradle file for another project included inthe composite build:
dependencies {// Note that the order of plugins differs from that// of the main project's build.gradle file. This results// in a build error because Gradle registers this as a// different classloader.classpath "me.tatarka:gradle-retrolambda:3.7.0"classpath "com.android.tools.build:gradle:3.4.0"}}
To get around this build error, add the following to thedependencies block of your project-level build.gradle file:
dependencies {classpath ('com.google.firebase:firebase-plugins:1.1.0') {exclude group: 'com.google.guava', module: 'guava-jdk5'}...}
For more information, see issue #63180002.
To use Protobufs, you must upgrade the Protobuf plugin to version 0.8.2or higher.
The third party
android-aptplugin is no longer supported. You shouldswitch to the ,which has been improved to handle resolving dependencies lazily.JAR signing (v1 scheme) does not support file names containing CarriageReturn (CR) characters.(See issue #63885809).
Android Gradle Plugin 3.0.0 and higher introduce API changes that remove certainfunctionalities and may break your existing builds. Later versions of theplugin may introduce new public APIs that replace broken functionalities.
Modifying variant outputs at build time may not work
Using the Variant API to manipulate variant outputs is broken with the newplugin. It still works for simple tasks, such as changing the APK name duringbuild time, as shown below:
- // If you use each() to iterate through the variant objects,
- // you need to start using all(). That's because each() iterates
- // through only the objects that already exist during configuration time—
- // but those object don't exist at configuration time with the new model.
- // However, all() adapts to the new model by picking up object as they are
- // added during execution.
- android.applicationVariants.all { variant ->
- variant.outputs.all {
- outputFileName = "${variant.name}-${variant.versionName}.apk"
- }
- }
However, more complicated tasks that involve accessing outputFile objectsno longer work. That's because variant-specific tasks are no longer createdduring the configuration stage. This results in the plugin not knowingall of its outputs up front, but it also means faster configuration times.
manifestOutputFile is no longer available
The processManifest.manifestOutputFile() method is no longer available, and you get the following error when you call it:
- A problem occurred configuring project ':myapp'.
- Could not get unknown property 'manifestOutputFile' for task ':myapp:processDebugManifest'
- of type com.android.build.gradle.tasks.ProcessManifest.
- android.applicationVariants.all { variant ->
- variant.outputs.all { output ->
- output.processManifest.doLast {
- // Stores the path to the maifest.
- String manifestPath = "$manifestOutputDirectory/AndroidManifest.xml"
- // Stores the contents of the manifest.
- def manifestContent = file(manifestPath).getText()
- // Changes the version code in the stored text.
- manifestContent = manifestContent.replace('android:versionCode="1"',
- String.format('android:versionCode="%s"', generatedCode))
- // Overwrites the manifest with the new text.
- file(manifestPath).write(manifestContent)
- }
- }
- }

