
通常Pixi给你三种方式从已经加载的纹理贴图集中创建精灵:
- 如果你是使用的
loader来加载纹理贴图集, 使用loader的resources:let sprite = new Sprite(resources["images/treasureHunter.json"].textures["frameId.png"]);
- 要创建一个精灵需要输入太多东西了!
所以我建议你给纹理贴图集的textures对象创建一个叫做id的别名,象是这样:
现在你就可以像这样实例化一个精灵了:let id = PIXI.loader.resources["images/treasureHunter.json"].textures;
真不错啊~!let sprite = new Sprite(id["frameId.png"]);
这里在setup函数中用三种不同的创建方法创建和显示了dungeon, explorer, 和 treasure精灵。
这里是代码运行的结果:
explorer.y = app.stage.height / 2 - explorer.height / 2;
学会使用纹理贴图集来创建一个精灵是一个基本的操作。所以在我们继续之前,你来试着写一些这样的精灵吧:blob们和exit的门,让他们看起来象是这样:
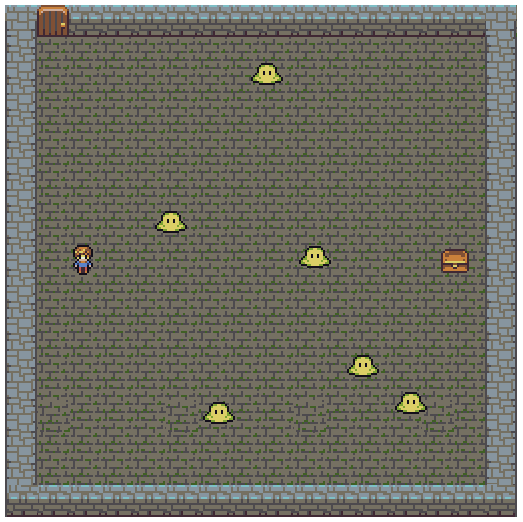
下面就是所有的代码啦。我也把HTML放了进来,现在你可以看见所有的上下文。(你可以在examples/spriteFromTextureAtlas.html找到可以用于演示的代码。)注意,blob精灵是用一个循环加进舞台的,并且他有一个随机的位置。
<!doctype html><meta charset="utf-8"><title>Make a sprite from a texture atlas</title><body><script src="../pixi/pixi.min.js"></script><script>//Aliaseslet Application = PIXI.Application,Container = PIXI.Container,loader = PIXI.loader,resources = PIXI.loader.resources,TextureCache = PIXI.utils.TextureCache,Sprite = PIXI.Sprite,Rectangle = PIXI.Rectangle;//Create a Pixi Applicationlet app = new Application({width: 512,height: 512,antialias: true,transparent: false,resolution: 1});//Add the canvas that Pixi automatically created for you to the HTML documentdocument.body.appendChild(app.view);loader.add("images/treasureHunter.json").load(setup);//Define variables that might be used in more//than one functionlet dungeon, explorer, treasure, door, id;function setup() {//There are 3 ways to make sprites from textures atlas frames//1. Access the `TextureCache` directlylet dungeonTexture = TextureCache["dungeon.png"];dungeon = new Sprite(dungeonTexture);app.stage.addChild(dungeon);//2. Access the texture using throuhg the loader's `resources`:explorer = new Sprite(resources["images/treasureHunter.json"].textures["explorer.png"]);explorer.x = 68;//Center the explorer verticallyexplorer.y = app.stage.height / 2 - explorer.height / 2;app.stage.addChild(explorer);//3. Create an optional alias called `id` for all the texture atlas//frame id textures.id = PIXI.loader.resources["images/treasureHunter.json"].textures;//Make the treasure box using the aliastreasure = new Sprite(id["treasure.png"]);app.stage.addChild(treasure);//Position the treasure next to the right edge of the canvastreasure.x = app.stage.width - treasure.width - 48;treasure.y = app.stage.height / 2 - treasure.height / 2;app.stage.addChild(treasure);//Make the exit doordoor = new Sprite(id["door.png"]);door.position.set(32, 0);app.stage.addChild(door);let numberOfBlobs = 6,spacing = 48,xOffset = 150;//Make as many blobs as there are `numberOfBlobs`//Make a bloblet blob = new Sprite(id["blob.png"]);//Space each blob horizontally according to the `spacing` value.//`xOffset` determines the point from the left of the screen//at which the first blob should be added.let x = spacing * i + xOffset;//Give the blob a random y position//(`randomInt` is a custom function - see below)let y = randomInt(0, app.stage.height - blob.height);//Set the blob's positionblob.x = x;blob.y = y;//Add the blob sprite to the stageapp.stage.addChild(blob);}}//The `randomInt` helper functionfunction randomInt(min, max) {return Math.floor(Math.random() * (max - min + 1)) + min;}</script></body>
你可以看见所有的泡泡怪都用一个for循环被创建了,每一个泡泡怪都有一个独一无二的x坐标,像是下面这样:
let x = spacing * i + xOffset;blob.x = x;
泡泡怪的y坐标将会从0到512之间随机取值,它的变量名是stage.height。它的值是利用randomInt函数来得到的。randomInt返回一个由你定义范围的随机数。
randomInt(lowestNumber, highestNumber)
这意味着如果你想要一个1到10之间的随机数,你可以这样得到它:
let randomNumber = randomInt(1, 10);
这是randomInt方法的定义:
function randomInt(min, max) {return Math.floor(Math.random() * (max - min + 1)) + min;
randomInt是一个很好的用来做游戏的工具函数,我经常用他。

