
Quick Start
If you are having problems please see the guide.
NOTE: kind does not require kubectl, but you will not be able to perform some of the examples in our docs without it. To install kubectl see the upstream reference here
Please use the latest Go when installing KIND from source, ideally go 1.14 or greater.
go get will put kind in $(go env GOPATH)/bin. You may need to add that directory to your $PATH as shown here if you encounter the error kind: command not found after installation.
Without installing Go, kind can be built reproducibly with docker using make build, the binary will be in bin/kind.
Stable binaries are also available on the page. Stable releases are generally recommended for CI usage in particular. To install, download the binary for your platform from “Assets” and place this into your $PATH.
curl -Lo ./kind https://kind.sigs.k8s.io/dl/v0.9.0/kind-linux-amd64 chmod +x ./kind mv ./kind /some-dir-in-your-PATH/kind
On Mac (homebrew): brew install kindor curl -Lo ./kind On Windows: curl.exe -Lo kind-windows-amd64.exe https://kind.sigs.k8s.io/dl/v0.9.0/kind-windows-amd64 Move-Item .\kind-windows-amd64.exe c:\some-dir-in-your-PATH\kind.exe
brew install kind
On Windows via Chocolatey () choco install kind ## Creating a Cluster Creating a Kubernetes cluster is as simple as
Move-Item .\kind-windows-amd64.exe c:\some-dir-in-your-PATH\kind.exe
kind create cluster.
This will bootstrap a Kubernetes cluster using a pre-built node image - you can find it on docker hub . If you desire to build the node image yourself see the building image section. To specify another image use the --image flag.
By default, the cluster will be given the name kind. Use the --name flag to assign the cluster a different context name.
If you want the create cluster command to block until the control plane reaches a ready status, you can use the --wait flag and specify a timeout. To use --wait you must specify the units of the time to wait. For example, to wait for 30 seconds, do --wait 30s, for 5 minutes do --wait 5m, etc.
## Interacting With Your Cluster
After , you can use kubectl to interact with it by using the .
By default, the cluster access configuration is stored in ${HOME}/.kube/config if $KUBECONFIG environment variable is not set.
If $KUBECONFIG environment variable is set, then it is used as a list of paths (normal path delimiting rules for your system). These paths are merged. When a value is modified, it is modified in the file that defines the stanza. When a value is created, it is created in the first file that exists. If no files in the chain exist, then it creates the last file in the list.
You can use the --kubeconfig flag when creating the cluster, then only that file is loaded. The flag may only be set once and no merging takes place.
To see all the clusters you have created, you can use the get clusters command.
For example, let’s say you create two clusters:
kind create cluster # Default cluster context name is `kind`.
...
kind create cluster --name kind-2
When you list your kind clusters, you will see something like the following:
kind get clusters
kind
kind-2
In order to interact with a specific cluster, you only need to specify the cluster name as a context in kubectl:
kubectl cluster-info --context kind-kind
kubectl cluster-info --context kind-kind-2
## Deleting a Cluster
If you created a cluster with kind create cluster then deleting is equally simple:
kind delete cluster
If the flag is not specified, kind will use the default cluster context name kind and delete that cluster.
## Loading an Image Into Your Cluster
Docker images can be loaded into your cluster nodes with: kind load docker-image my-custom-image
Note: If using a named cluster you will need to specify the name of the cluster you wish to load the image into: kind load docker-image my-custom-image --name kind-2
Additionally, image archives can be loaded with: kind load image-archive /my-image-archive.tar
This allows a workflow like:
docker build -t my-custom-image:unique-tag ./my-image-dir
kind load docker-image my-custom-image:unique-tag
kubectl apply -f my-manifest-using-my-image:unique-tag
Note: You can get a list of images present on a cluster node by using docker exec:
docker exec -it my-node-name crictl images
Where my-node-name is the name of the Docker container.
Note: The Kubernetes default pull policy is IfNotPresent unless the image tag is :latest in which case the default policy is Always. IfNotPresent causes the Kubelet to skip pulling an image if it already exists. If you want those images loaded into node to work as expected, please:
- don’t use a :latest tag
and / or:
- specify imagePullPolicy: IfNotPresent or imagePullPolicy: Never on your container(s).
See Kubernetes imagePullPolicy for more information.
See also: .
## Building Images
> Note: If you’re using Docker Desktop, be sure to read Settings for Docker Desktop first.
kind runs a local Kubernetes cluster by using Docker containers as “nodes”. kind uses the to run Kubernetes artifacts, such as kubeadm or kubelet. The node-image in turn is built off the base-image, which installs all the dependencies needed for Docker and Kubernetes to run in a container.
See for more advanced information.
Currently, kind supports two different ways to build a node-image if you have the Kubernetes source in your host machine ($GOPATH/src/k8s.io/kubernetes), by using docker or bazel. To specify the build type use the flag --type. Note however that using --type=bazel on Windows or MacOS will not work currently due to Kubelet using which requires GCC/glibc for linux. A workaround may be enabled in the future.
kind will default to using the build type docker if none is specified.
kind build node-image --type bazel
Similarly as for the base-image command, you can specify the name and tag of the resulting node image using the flag --image.
If you previously changed the name and tag of the base image, you can use here the flag --base-image to specify the name and tag you used.
### Settings for Docker Desktop
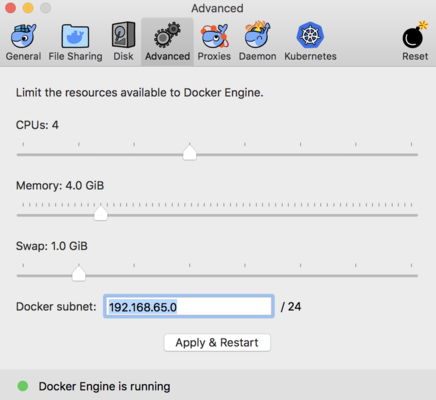
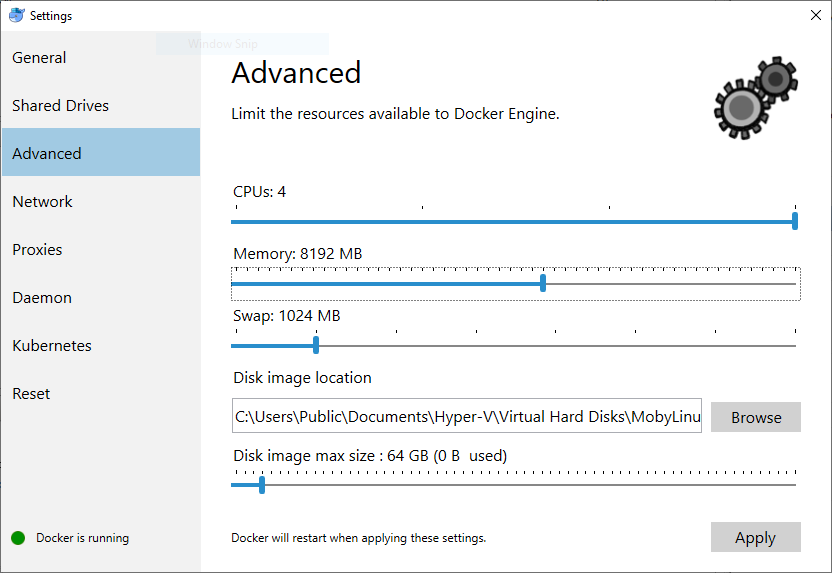
If you are building Kubernetes (for example - kind build node-image) on MacOS or Windows then you need a minimum of 6GB of RAM dedicated to the virtual machine (VM) running the Docker engine. 8GB is recommended.
To change the resource limits for the Docker on Mac, you’ll need to open the Preferences menu.Now, go to the Advanced settings page, and change the settings there, see changing Docker’s resource limits.
 To change the resource limits for the Docker on Windows, you’ll need to right-click the Moby icon on the taskbar, and choose “Settings”. If you see “Switch to Linux Containers”, then you’ll need to do that first before opening “Settings”
Now, go to the Advanced settings page, and change the settings there, see .
To change the resource limits for the Docker on Windows, you’ll need to right-click the Moby icon on the taskbar, and choose “Settings”. If you see “Switch to Linux Containers”, then you’ll need to do that first before opening “Settings”
Now, go to the Advanced settings page, and change the settings there, see .
 You may also try removing any unused data left by the Docker engine - e.g.,
 docker system prune.
## Advanced
### Building The Base Image
To build the base-image we use the make quick command in images/base directory:
By default, the base image will be tagged as kindest/base:$(date +v%Y%m%d)-$(git describe --always --dirty) format. If you want to change this, you can set TAG environment variable.
TAG=v0.1.0 make quick
### Configuring Your kind Cluster
For a sample kind configuration file see kind-example-config. To specify a configuration file when creating a cluster, use the --config flag:
kind create cluster --config kind-example-config.yaml
#### Multi-node clusters
In particular, many users may be interested in multi-node clusters. A simple configuration for this can be achieved with the following config file contents:
# three node (two workers) cluster config
kind: Cluster
apiVersion: kind.x-k8s.io/v1alpha4
nodes:
- role: control-plane
- role: worker
- role: worker
#### Control-plane HA
You can also have a cluster with multiple control-plane nodes:
# a cluster with 3 control-plane nodes and 3 workers
kind: Cluster
apiVersion: kind.x-k8s.io/v1alpha4
nodes:
- role: control-plane
- role: control-plane
- role: control-plane
- role: worker
- role: worker
- role: worker
#### Mapping ports to the host machine
You can map extra ports from the nodes to the host machine with extraPortMappings:
kind: Cluster
apiVersion: kind.x-k8s.io/v1alpha4
nodes:
- role: control-plane
  extraPortMappings:
  - containerPort: 80
    hostPort: 80
    listenAddress: "0.0.0.0" # Optional, defaults to "0.0.0.0"
    protocol: udp # Optional, defaults to tcp
This can be useful if using NodePort services or daemonsets exposing host ports.
Note: binding the listenAddress to 127.0.0.1 may affect your ability to access the service.
#### Setting Kubernetes version
You can also set a specific Kubernetes version by setting the node‘s container image. You can find available image tags on the . Please use the sha256 shasum for your desired kubernetes version, as seen in this example:
kind: Cluster
apiVersion: kind.x-k8s.io/v1alpha4
nodes:
- role: control-plane
  image: kindest/node:v1.16.4@sha256:b91a2c2317a000f3a783489dfb755064177dbc3a0b2f4147d50f04825d016f55
- role: worker
  image: kindest/node:v1.16.4@sha256:b91a2c2317a000f3a783489dfb755064177dbc3a0b2f4147d50f04825d016f55
### Enable Feature Gates in Your Cluster
Feature gates are a set of key=value pairs that describe alpha or experimental features. In order to enable a gate you have to customize your kubeadm configuration, and it will depend on what gate and component you want to enable. An example kind config can be:
kind: Cluster apiVersion: kind.x-k8s.io/v1alpha4 featureGates: FeatureGateName: true
#### IPv6 clusters You can run IPv6 single-stack clusters using
kind: ClusterfeatureGates:FeatureGateName: true
kind, if the host that runs the docker containers support IPv6. Most operating systems / distros have IPv6 enabled by defualt, but you can check on Linux with the following command:
sudo sysctl net.ipv6.conf.all.disable_ipv6
You should see:
net.ipv6.conf.all.disable_ipv6 = 0
If you are using Docker on Windows or Mac, you will need to use an IPv4 port forward for the API Server from the host because IPv6 port forwards don’t work on these platforms, you can do this with the following config:
# an ipv6 cluster
kind: Cluster
apiVersion: kind.x-k8s.io/v1alpha4
networking:
  ipFamily: ipv6
  apiServerAddress: 127.0.0.1
On Linux all you need is:
# an ipv6 cluster
kind: Cluster
apiVersion: kind.x-k8s.io/v1alpha4
networking:
  ipFamily: ipv6
### Configure kind to use a proxy
If you are running kind in an environment that requires a proxy, you may need to configure kind to use it.
You can configure kind to use a proxy using one or more of the following (uppercase takes precedence):
- HTTP_PROXY or http_proxy
- HTTPS_PROXY or https_proxy
- NO_PROXY or no_proxy
Note: If you set a proxy it would be used for all the connection requests. It’s important that you define what addresses doesn’t need to be proxied with the NO_PROXY variable, typically you should avoid to proxy your docker network range NO_PROXY=172.17.0.0/16
### Exporting Cluster Logs
kind has the ability to export all kind related logs for you to explore. To export all logs from the default cluster (context name kind):
kind export logs
Exported logs to: /tmp/396758314
Like all other commands, if you want to perform the action on a cluster with a different context name use the --name flag.
As you can see, kind placed all the logs for the cluster kind in a temporary directory. If you want to specify a location then simply add the path to the directory after the command:
The structure of the logs will look more or less like this:
.
├── docker-info.txt
└── kind-control-plane/
    ├── containers
    ├── docker.log
    ├── inspect.json
    ├── journal.log
    ├── kubelet.log
    ├── kubernetes-version.txt
    └── pods/
The logs contain information about the Docker host, the containers running kind, the Kubernetes cluster itself, etc.

