
Geom
几何标记对象,决定创建图表的类型,具体的概念介绍请参见 。
下面是一条简单的绘制柱状图的语法,声明完使用的 geom 类型之后,就可以进行图形上的各种图形属性映射,下面我们会进行详述。
- chart.interval().position('x*y').color('x');
注意:上述 返回的不是 chart 对象,而是一个 geom 几何标记对象 Geom。
以下是目前 Geom 的基本类型:
另外结合对数据的调整方式,G2 还默认提供了如下的类型:
当然几何标记和数据调整方式的组合不仅仅局限于上述几种,可以通过整合几何标记和数据调整方式来自由创建和组合图表:
- chart.area().position('x*y').adjust([ 'stack', 'symmetric' ]);
Geom 支持的接口可以分为三大类:
- 数据映射相关的属性函数: position, color, shape, size, opacity;
- 显示辅助信息的函数: style, label, tooltip;
- 额外的控制函数: adjust, select, active,show, hide。
将数据值映射到图形的位置上的方法。
- line().position('x*y');
- line().position([ 'x', 'y' ]);
position('fieldA*fieldB')
使用 连接,position 属性会对多个字段进行数据的映射,如:cut_price,x_y 等,用于二维坐标系图表的绘制。
以 chart.point().position('x_y') 为例,point 代表图形,即最后需要生成点图,而 position 代表位置,position('x_y') 代表数据在图形中的位置由 x 和 y 这两个维度的变量决定,x * y 的数据处理结果可以理解为:
(x1, y1) 这样的数值对,最后就会被转换为画布上对应的坐标点。
另外,也可以以数组格式传入:chart.geom().position([ 'fieldA', 'fieldB' ])
color
将数据值映射到图形的颜色上的方法。
- line().color('red'); // 常量颜色
- line().color('type'); // 对 type 字段进行映射,使用内置的颜色
- line().color('type', [ 'red', 'blue' ]) // 指定颜色
- line().color('type', (type) => { // 通过回调函数
- if (type === 'a') {
- return 'red';
- }
- return 'blue';
- });
- line().color('type*value', (type, value) => { //多个参数,通过回调函数
- if (type === 'a' && value > 100) {
- return 'red';
- }
- return 'blue';
- });
color(value)
参数
- value: string
只支持接收一个参数,value 可以是:
- 映射至颜色属性的数据源字段名,如果数据源中不存在这个字段名的话,则按照常量进行解析,这个时候会使用 G2 默认提供的颜色。
- 也可以直接指定某一个具体的颜色值 color,如 '#fff', 'white' 等。
代码示例
- chart.point().position('x*y').color('x'); // 对 x 字段进行映射,使用内置的颜色
- chart.point().position('x*y').color('red'); // 所有点用红色渲染
color(field, colors)
参数
- field: string
field 为映射至颜色属性的数据源字段名,也支持指定多个参数。
- colors: string | array | function
colors 的参数有以下情况:
- 如果为空,即未指定颜色的数组,那么使用内置的全局的颜色;
- 如果需要指定颜色,则需要以数组格式传入,那么分类的颜色按照数组中的颜色确定。对于颜色的分配顺序,会默认按照原始数据源中字段的顺序进行分配;
- 还支持渐变颜色设置:'color1-color2',用于指定一个渐变色,数据根据分类或者连续类型,在渐变的颜色区间内取颜色。
chart.point().position('xy').color('z'); // 使用默认的颜色
chart.point().position('xy').color('z', [ 'red', 'blue' ]); // 使用传入的指定颜色
chart.point().position('xy').color('z', 'red-blue'); // 使用渐变色
chart.point().position('xy').color('z', 'l(270) 0:#173162 1:#3663a1'); // 使用渐变色,l 后面传入角度,0 代表起始颜色,1 代表结束颜色
- colors 如果是回调函数,则该回调函数的参数为对应字段的数值,具体使用如下,当 color 映射为多个字段时,参数按照字段声明的顺序传入:
chart.point().position('x*y').color('z', (value) => {
if(value === 1) {
return 'red'
}
return 'blue';
});
shape
将数据值映射到图形的形状上的方法。
- point.shape('circle'); // 常量
- point.shape('type'); // 使用字段映射到形状,使用内置的形状
- point.shape('type', [ 'circle', 'diamond', 'square' ]); // 指定形状
- point.shape('type', (type) => { // 回调函数
- if(type === 'a') {
- return 'circle';
- }
- return 'square';
- });
shape(shape)
参数
- shape: string
代码示例
- chart.point().position('x*y').shape('square'); // 指定所有点的图形是正方形
shape(field, shapes)
指定多个图形,图形的顺序跟字段的值对应。
参数
- field: string
dim 为映射至颜色属性的数据源字段名。
- shapes: string | array
shapes 是一个可选参数,如果没有声明会按照 G2 默认为特定 geom 类型配置的形状进行渲染,当然用户也可自己指定渲染的形状,具体的形状已在上面列出,下面是 G2 为特定的几何图形对象提供的 shapes:
- const shapes = {
- point: [ 'hollowCircle', 'hollowSquare', 'hollowDiamond', 'hollowBowtie', 'hollowTriangle', 'hollowHexagon', 'cross', 'tick', 'plus', 'hyphen', 'line' ],
- line: [ 'line', 'dash', 'dot' ],
- area: [ 'area' ]
- };
代码示例
- const defs = {
- 'cut': {
- values: [ 'Ideal', 'Premium', 'Very-Good', 'Good', 'Fair' ]
- }
- };
- chart.source(data, defs);
- chart.point().position('carat*price').shape('cut'); // 使用默认的 shapes
- chart.point().position('carat*price').shape('cut', [ 'cross', 'tick', 'plus', 'hyphen', 'line' ]); // 使用自定义的 shapes
shape(field, callback)
通过回调函数设置图形类型.
参数
- field: string
field 为映射至颜色属性的数据源字段名。
- callback: function
[Function] 回调函数
代码示例
- chart.point().position('x*y').shape('z', (value) => {
- if (value === 1) {
- return 'circle'
- }
- return 'square';
- });
size
将数据值映射到图形的大小上的方法。
- point.size(10); // 常量
- point.size('type', [ 0, 10 ]); // 使用字段映射到大小,并指定最大值和最小值
- point.size('type', (type) => { // 回调函数
- if(type === 'a') {
- return 10;
- }
- return 5;
- });
size(value)
传入数字常量,如 chart.point().size(20)。
注意: 不同图形的 size 的含义有所差别:
- point 图形的 size 影响点的半径大小;
- line, area, path 中的 size 影响线的粗细;
- interval 的 size 影响柱状图的宽度。
size(field)
根据 field 字段的值映射大小,使用默认的最大值 max:10 和最小值 min: 1。
代码示例
size(field, [min, max])
根据 field 字段的值映射大小,使用声明的最大值 max 和最小值 min。
代码示例
- chart.point().position('x*y').size('z', [ 10, 100 ]); // 使用 z 字段的值来映射大小,最大值为 100,最小值 10
size(field, callback)
使用回调函数控制图形大小。
参数
- callback: function
回调函数。
代码示例
- chart.point().position('x*y').size('z', (value) => {
- if(value === 1) {
- return 5;
- }
- return 10;
- });
opacity
将数据值映射到图形的透明度上的方法。
- point.opacity(0.3); // 常量,但是数值范围为 0 - 1
- point.opacity('type'); // 使用字段映射到透明度
- point.opacity('type', (type) => { // 回调函数
- if(type === 'a') {
- return 1;
- }
- return 0.5;
- });
opacity(value)
直接指定所有图形的透明度,value 为 0 至 1 范围的小数。
代码示例
- chart.interval().position('x*y').opacity(0.8); // 图形颜色为 0.8 透明度
opacity(field)
根据 field 字段的值计算透明度。
代码示例
- chart.interval().position('x*y').opacity('z');
opacity(field, callback)
通过回调函数设置透明度。
代码示例
- chart.point().position('x*y').opacity('z', (value) => {
- if(value === 1) {
- return 0.5;
- }
- return 0.8;
- });
声明几何标记对象的数据调整方式,可用于绘制层叠图、扰动图、分组图等。支持单一的数据调整方式也支持各种数据调整方式的组合。
G2 支持的调整类型包括: 'stack', 'dodge', 'jitter', 'symmetric'
- interval().adjust('stack');
- interval().adjust([ 'dodge', 'stack' ]);
- interval().adjust([{
- type: 'dodge',
- marginRatio: 0, // 数值范围为 0 至 1,用于调整分组中各个柱子的间距
- dodgeBy: 'xx' // 声明按照 xx 字段进行分组,一般不需要声明
- }]);
上述已经已经提到我们除了提供一些基本的几何图形对象类型之外,结合数据的调整方式提供了类似 pointStack 的类型,其实这些类型也可以通过参数的形式传入,并且用户还可以对这些数据的调整方式进行组合,创造出新颖多样的图表来。如下代码示例:
- chart.interval().position('x*y').color('z').adjust('stack');
label
将数据值映射到图形的文本上的方法。
- line.label('field'); // 显示某个字段的文本
- line.label('x*y*z', (x, y, z) => {
- return; // something
- });
- line.label('x', {
- offset: 10
- textStyle: {
- fill: 'red'
- }
- });
- textStyle 的更详细的配置项 绘图属性
label(field)
显示 field 字段对应的文本。
参数
- field: String
代表数据源中的数据字段名。
代码示例
- chart.point().position('x*y').label('x');
label(field, cfg)
- chart.line().label('x', {
- // 文本线的配置,如果值为 false,表示不展示文本线
- labelLine: {
- lineWidth: 1, // 线的粗细
- stroke: '#ff8800', // 线的颜色
- lineDash: [ 2, 1 ], // 虚线样式
- } | false,
- // 数值,设置坐标轴文本 label 距离坐标轴线的距离
- offset: number,
- // 设置文本的显示样式,还可以是个回调函数,回调函数的参数为该坐标轴对应字段的数值
- textStyle: {
- textAlign: 'center', // 文本对齐方向,可取值为: start middle end
- fill: '#404040', // 文本的颜色
- fontSize: '12', // 文本大小
- fontWeight: 'bold', // 文本粗细
- rotate: 30,
- textBaseline: 'top' // 文本基准线,可取 top middle bottom,默认为middle
- } || (text) => {
- // text: 坐标轴对应字段的数值
- },
- // 文本是否需要自动旋转,默认为 true
- autoRotate: boolean,
- /**
- * 用于格式化坐标轴上显示的文本信息的回调函数
- * @param {string} text 文本值
- * @param {object} item 该文本值对应的原始数据记录
- * @param {number} index 索引值
- * @return {string} 返回格式化后的文本
- */
- formatter(text, item, index) {},
- /**
- * 使用 html 渲染文本
- * @param {string} text 文本值
- * @param {object} item 该文本值对应的原始数据记录
- * @param {number} index 索引值
- * @return {string} 返回 html 字符串
- */
- htmlTemplate(text, item, index) {}
- })
- textStyle 的更详细的配置项
- htmlTemplate 默认为 null, 配置为回调函数时,既开启 html 渲染文本
label(field, callback, cfg)
使用回调函数控制文本显示。
参数
field: string
代表数据源中的数据字段名。callback: function
回调函数。cfg: object
该配置用法同chart.geom().label(field, cfg)中的 cfg 属性。
代码示例
- textStyle 的更详细的配置项 绘图属性
tooltip
将数据值映射到 Tooltip 上。
- tooltip(false); // 关闭该 geom 上的 tooltip
- tooltip('x');
- tooltip('x*y');
- tooltip('x*y', (x, y) => {})
tooltip(false)
关闭该 geom 上的 tooltip。
tooltip(field)
(field: string)
对应数据源的一个或者多个字段,当有多个时,使用 * 来连接。
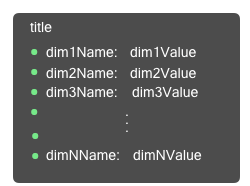
- chart.<geom>.tooltip('dim1*dim2...*dimN');
这个时候 tooltip 的显示内容如下:
代码示例
- const data = [
- { gender: "female", height: 161.2, weight: 51.6 },
- { gender: "female", height: 167.5, weight: 59 },
- { gender: "male", height: 159.5, weight: 49.2 },
- { gender: "male", height: 157, weight: 63 },
- { gender: "female", height: 155.8, weight: 53.6 }
- ];
- const chart = new G2.Chart({
- container: 'c2',
- forceFit: true,
- height: 400
- });
- chart.source(data, {
- weight: {
- alias: '体重(kg)'
- },
- height: {
- alias: '身高(cm)'
- });
- chart.tooltip({
- showTitle: false
- });
- chart.point().position('height*weight')
- .color('gender', [ '#f96a52', '#00a3d7' ])
- .opacity(0.5)
- .shape('circle')
- .tooltip('gender*height*weight');
- chart.render();
tooltip(field, callback)
(field: string, callback: function)
geom.tooltip() 方法支持回调,使用方式如下,其返回的值必须为对象,该值中的属性同 chart.tooltip() 的 itemTpl 模板相对应,返回的变量可用于 的字符串模板:
- chart.tooltip({
- itemTpl: '<li>{x}: {y}</li>'
- });
- chart.line()
- .position('x*y')
- .tooltip('x*y', (x, y) => {
- return {
- x,
- y
- };
- );
下面是一个实际 demo:
- const { DataView } = DataSet;
- const data = [
- { item: '事例一', count: 40 },
- { item: '事例二', count: 21 },
- { item: '事例三', count: 17 },
- { item: '事例四', count: 13 },
- { item: '事例五', count: 9 }
- ];
- const dv = new DataView();
- dv.source(data).transform({
- type: 'percent',
- field: 'count',
- dimension: 'item',
- as: 'percent'
- });
- const chart = new G2.Chart({
- container: 'c3',
- forceFit: true,
- height: 400,
- padding: [ 80, 100, 80, 80 ]
- });
- chart.source(dv, {
- percent: {
- formatter: val => {
- val = (val * 100) + '%';
- return val;
- }
- }
- });
- chart.coord('theta', {
- radius: 0.75
- });
- chart.tooltip({
- showTitle: false,
- itemTpl: '<li><span style="background-color:{color};" class="g2-tooltip-marker"></span>{name}: {value}</li>'
- });
- chart.intervalStack()
- .position('percent')
- .color('item')
- .label('percent', {
- formatter: (val, item) => {
- return item.point.item + ': ' + val;
- }
- })
- .tooltip('item*percent', (item, percent) => {
- percent = percent * 100 + '%';
- return {
- name: item,
- value: '<span style="color: #1890ff;">' + percent + '</span>'
- };
- })
- .style({
- lineWidth: 1,
- stroke: '#fff'
- });
- chart.render();
- style 的更详细的配置项
style
用于配置几何标记显示的图形属性。
- // 几种使用方式
- line().style({ // 统一为所有 shape 设置固定的样式
- lineWidth: 2
- });
- line().style('a*b', { // 使用回调函数设置属性
- lineWidth: (a, b) => {},
- stroke: 'red'
- });
- style 的更详细的配置项 绘图属性
select
开启、关闭以及设置 shape 对于鼠标 click 事件的响应效果, G2 默认仅为饼图开启了选中效果。
- geom.select(false); // 关闭
- geom.select(true); // 打开
- geom.select([true,] {
- mode: 'single' | 'multiple', // 选中模式,单选、多选
- style: {}, // 选中后 shape 的样式
- cancelable: true | false, // 选中之后是否允许取消选中,默认允许取消选中
- animate: true | false // 选中是否执行动画,默认执行动画
- });
- style 的更详细的配置项
开启以及关闭 shape 对于鼠标 hover 时的响应效果,G2 默认为各个 shaoe 内置了 active 效果 。
- geom.active(false); // 关闭默认响应
- geom.active(true); // 开启默认响应
- geom.active([true], {
- highlight: false, // true 是否开启 highlight 效果,开启时没有激活的变灰
- style: {
- fill: 'red'
- }
- });
- style 的更详细的配置项 绘图属性
animate
动画配置。
- geom().animate({
- appear: {
- // 初始入场动画配置
- }
- enter: {
- // 更新时出现动画配置
- },
- leave: {
- // 更新时销毁动画配置
- },
- update: {
- // 更新时改变动画配置
- }
- });
更加详细的配置参见 。
其他方法
show 显示,默认 geometry 显示,如果在创建 geometry 时设置 visible: false
- const line = chart.line({visible: false}).position('x*y');
- line.show();
hide 隐藏
- const line = chart.line().position('x*y');
setSelected
可以指定原始数据选中对应的图形

