
修改菜单
环境变量中的 logoUrl 是logo的url.
你可以在 src/assets 文件夹下添加logo并设置 logoUrl:
如何添加导航元素
你可以通过调用 RoutesService 的 add 方法添加路由到菜单,它是一个单例的服务,在root中提供,你可以立即注入使用它.
import { RoutesService, eLayoutType } from '@abp/ng.core';import { Component } from '@angular/core';@Component(/* component metadata */)export class AppComponent {constructor(routes: RoutesService) {routes.add([{path: '/your-path',name: 'Your navigation',order: 101,iconClass: 'fas fa-question-circle',requiredPolicy: 'permission key here',layout: eLayoutType.application,},{path: '/your-path/child',name: 'Your child navigation',parentName: 'Your navigation',order: 1,requiredPolicy: 'permission key here',},]);}}
另一种方法是使用路由提供程序. 首先创建一个提供程序:
// route.provider.tsimport { RoutesService, eLayoutType } from '@abp/ng.core';import { APP_INITIALIZER } from '@angular/core';export const APP_ROUTE_PROVIDER = [{ provide: APP_INITIALIZER, useFactory: configureRoutes, deps: [RoutesService], multi: true },];function configureRoutes(routes: RoutesService) {return () => {routes.add([{path: '/your-path',name: 'Your navigation',requiredPolicy: 'permission key here',order: 101,iconClass: 'fas fa-question-circle',layout: eLayoutType.application,{path: '/your-path/child',name: 'Your child navigation',parentName: 'Your navigation',requiredPolicy: 'permission key here',order: 1,]);};}
…然后在app.module.ts …
下面是每个属性的工作原理:
path是导航元素的绝对路径.name是导航元素的label. 可以使用本地化Key和本地化对象.parentName是菜单中父路由的name的引用,用于创建多级菜单项.requiredPolicy是用于访问该页面的权限Key. 参阅.order是导航元素的排序.Administration的顺序是100. 在排序top级别菜单项时请记得这一点.iconClass是i标签的class, 它放在导航label的左边.layout定义路由使用哪个布局加载. (默认:eLayoutType.empty).invisible使该项在菜单中不可见. (默认:false).
通过 AppRoutingModule 的 routes 属性
你可以像以下一样添加 routes 属性:
{path: 'your-path',data: {routes: {name: 'Your navigation',order: 101,iconClass: 'fas fa-question-circle',requiredPolicy: 'permission key here',children: [{path: 'child',name: 'Your child navigation',order: 1,requiredPolicy: 'permission key here',},],},},}
或者你可以这样做:
{path: 'your-path',data: {routes: [{path: '/your-path',name: 'Your navigation',order: 101,iconClass: 'fas fa-question-circle',requiredPolicy: 'permission key here',},{path: '/your-path/child',name: 'Your child navigation',requiredPolicy: 'permission key here',},] as ABP.Route[], // can be imported from @abp/ng.core},}
第二种方法的优点是你不必绑定到父/子结构,可以使用任何喜欢的路由.
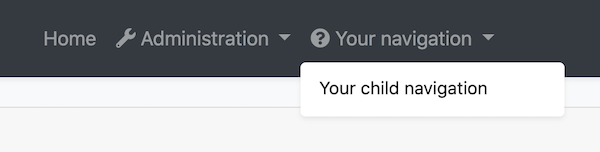
如上所述添加 routes 属性后,导航菜单看起来像这样:
RoutesService 的 patch 方法通过名称查找路由,并将配置替换为第二个参数传递的新配置. remove 方法会找到一个路由并将其连同其子路由一起删除.
- 根据给定的
parentName将 Home 导航移动到 Administration 下拉菜单下. - 为 Home 添加了图标.
- 指定 Home 的顺序为列表的第一项.
- 为 Home 添加了一个名为 Dashboard 的子路由.
- 删除 Your navigation 与其子路由.
如何在菜单的右侧添加元素
你可以通过调用 NavItemsService 的 addItems 方法将元素添加到菜单的右侧. 这是一个单例服务,即以根身份提供. 因此你可以立即注入并使用它.
import { NavItemsService } from '@abp/ng.theme.shared';import { Component } from '@angular/core';@Component({template: `<input type="search" placeholder="Search" class="bg-transparent border-0 color-white" />`,})export class MySearchInputComponent {}@Component(/* component metadata */)export class AppComponent {constructor(private navItems: NavItemsService) {navItems.addItems([{id: 'MySearchInput',order: 1,component: MySearchInputComponent,},{id: 'SignOutIcon',html: '<i class="fas fa-sign-out-alt fa-lg text-white m-2"><i>',action: () => console.log('Clicked the sign out icon'),order: 101, // puts as last element},]);}}
上面我们在菜单添加了一个搜索输入和退出登录图标,最终UI如下:
NavItemsService 的 patchItem 方法通过 id 查找元素,并将配置替换为第二个参数传递的新配置. removeItem 方法会找到一个元素并删除.
export class AppComponent {constructor(private navItems: NavItemsService) {navItems.patchItem(eThemeBasicComponents.Languages, {requiredPolicy: 'new policy here',order: 1,});navItems.removeItem(eThemeBasicComponents.CurrentUser);}}
- 使用新的 和新的
order修补了语言下拉菜单元素.

